.jpg)
Session Tracking in Servlets
Session simply means a particular interval of time.Session Tracking is a way to maintain state (data) of an user. It is also known as session management in servlet.
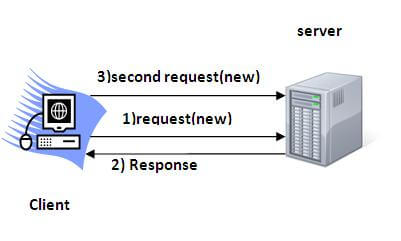
Http protocol is a stateless so we need to maintain state using session tracking techniques. Each time user requests to the server, server treats the request as the new request. So we need to maintain the state of an user to recognize to particular user.
HTTP is stateless that means each request is considered as the new request. It is shown in the figure given below:
Why use Session Tracking?
To recognize the user It is used to recognize the particular user.Session Tracking Techniques
There are four techniques used in Session tracking:- Cookies
- Hidden Form Field
- URL Rewriting
- HttpSession
Cookies in Servlet
A cookie is a small piece of information that is persisted between the multiple client requests.
A cookie has a name, a single value, and optional attributes such as a comment, path and domain qualifiers, a maximum age, and a version number.
How Cookie works
By default, each request is considered as a new request. In cookies technique, we add cookie with response from the servlet. So cookie is stored in the cache of the browser. After that if request is sent by the user, cookie is added with request by default. Thus, we recognize the user as the old user.
Types of Cookie
There are 2 types of cookies in servlets.
1.Non-persistent cookie
2.Persistent cookie
Non-persistent cookie
It is valid for single session only. It is removed each time when user closes the browser.Persistent cookie
It is valid for multiple session . It is not removed each time when user closes the browser. It is removed only if user logout or signout.Advantage of Cookies
- Simplest technique of maintaining the state.
- Cookies are maintained at client side.
Disadvantage of Cookies
- It will not work if cookie is disabled from the browser.
- Only textual information can be set in Cookie object.
Note: Gmail uses cookie technique for login. If you disable the cookie, gmail won't work.
Cookie class
javax.servlet.http.Cookie class provides the functionality of using cookies. It provides a lot of useful methods for cookies.Constructor of Cookie class
| Constructor | Description |
|---|---|
| Cookie() | constructs a cookie. |
| Cookie(String name, String value) | constructs a cookie with a specified name and value. |
Useful Methods of Cookie class
There are given some commonly used methods of the Cookie class.| Method | Description |
|---|---|
| public void setMaxAge(int expiry) | Sets the maximum age of the cookie in seconds. |
| public String getName() | Returns the name of the cookie. The name cannot be changed after creation. |
| public String getValue() | Returns the value of the cookie. |
| public void setName(String name) | changes the name of the cookie. |
| public void setValue(String value) | changes the value of the cookie. |
Other methods required for using Cookies
For adding cookie or getting the value from the cookie, we need some methods provided by other interfaces. They are:
|
How to create Cookie?
Let's see the simple code to create cookie.- Cookie ck=new Cookie("user","sonoo jaiswal");//creating cookie object
- response.addCookie(ck);//adding cookie in the response
How to delete Cookie?
Let's see the simple code to delete cookie. It is mainly used to logout or signout the user.- Cookie ck=new Cookie("user","");//deleting value of cookie
- ck.setMaxAge(0);//changing the maximum age to 0 seconds
- response.addCookie(ck);//adding cookie in the response
How to get Cookies?
Let's see the simple code to get all the cookies.- Cookie ck[]=request.getCookies();
- for(int i=0;i<ck.length;i++){
- out.print("<br>"+ck[i].getName()+" "+ck[i].getValue());//printing name and value of cookie
- }
Simple example of Servlet Cookies
In this example, we are storing the name of the user in the cookie object and accessing it in another servlet. As we know well that session corresponds to the particular user. So if you access it from too many browsers with different values, you will get the different value.
index.html
- <form action="servlet1" method="post">
- Name:<input type="text" name="userName"/><br/>
- <input type="submit" value="go"/>
- </form>
FirstServlet.java
- import java.io.*;
- import javax.servlet.*;
- import javax.servlet.http.*;
- public class FirstServlet extends HttpServlet {
- public void doPost(HttpServletRequest request, HttpServletResponse response){
- try{
- response.setContentType("text/html");
- PrintWriter out = response.getWriter();
- String n=request.getParameter("userName");
- out.print("Welcome "+n);
- Cookie ck=new Cookie("uname",n);//creating cookie object
- response.addCookie(ck);//adding cookie in the response
- //creating submit button
- out.print("<form action='servlet2'>");
- out.print("<input type='submit' value='go'>");
- out.print("</form>");
- out.close();
- }catch(Exception e){System.out.println(e);}
- }
- }
SecondServlet.java
- import java.io.*;
- import javax.servlet.*;
- import javax.servlet.http.*;
- public class SecondServlet extends HttpServlet {
- public void doPost(HttpServletRequest request, HttpServletResponse response){
- try{
- response.setContentType("text/html");
- PrintWriter out = response.getWriter();
- Cookie ck[]=request.getCookies();
- out.print("Hello "+ck[0].getValue());
- out.close();
- }catch(Exception e){System.out.println(e);}
- }
- }
web.xml
- <web-app>
- <servlet>
- <servlet-name>s1</servlet-name>
- <servlet-class>FirstServlet</servlet-class>
- </servlet>
- <servlet-mapping>
- <servlet-name>s1</servlet-name>
- <url-pattern>/servlet1</url-pattern>
- </servlet-mapping>
- <servlet>
- <servlet-name>s2</servlet-name>
- <servlet-class>SecondServlet</servlet-class>
- </servlet>
- <servlet-mapping>
- <servlet-name>s2</servlet-name>
- <url-pattern>/servlet2</url-pattern>
- </servlet-mapping>
- </web-app>
Output


-
2) Hidden Form Field
In case of Hidden Form Field a hidden (invisible) textfield is used for maintaining the state of an user.
In such case, we store the information in the hidden field and get it from another servlet. This approach is better if we have to submit form in all the pages and we don't want to depend on the browser.
Let's see the code to store value in hidden field.Here, uname is the hidden field name and Vimal Jaiswal is the hidden field value.- <input type="hidden" name="uname" value="Vimal Jaiswal">
Real application of hidden form field
It is widely used in comment form of a website. In such case, we store page id or page name in the hidden field so that each page can be uniquely identified.
Advantage of Hidden Form Field
- It will always work whether cookie is disabled or not.
Disadvantage of Hidden Form Field:
- It is maintained at server side.
- Extra form submission is required on each pages.
- Only textual information can be used.
Example of using Hidden Form Field
In this example, we are storing the name of the user in a hidden textfield and getting that value from another servlet.
index.html
- <form action="servlet1">
- Name:<input type="text" name="userName"/><br/>
- <input type="submit" value="go"/>
- </form>
FirstServlet.java
- import java.io.*;
- import javax.servlet.*;
- import javax.servlet.http.*;
- public class FirstServlet extends HttpServlet {
- public void doGet(HttpServletRequest request, HttpServletResponse response){
- try{
- response.setContentType("text/html");
- PrintWriter out = response.getWriter();
- String n=request.getParameter("userName");
- out.print("Welcome "+n);
- //creating form that have invisible textfield
- out.print("<form action='servlet2'>");
- out.print("<input type='hidden' name='uname' value='"+n+"'>");
- out.print("<input type='submit' value='go'>");
- out.print("</form>");
- out.close();
- }catch(Exception e){System.out.println(e);}
- }
- }
SecondServlet.java
- import java.io.*;
- import javax.servlet.*;
- import javax.servlet.http.*;
- public class SecondServlet extends HttpServlet {
- public void doGet(HttpServletRequest request, HttpServletResponse response)
- try{
- response.setContentType("text/html");
- PrintWriter out = response.getWriter();
- //Getting the value from the hidden field
- String n=request.getParameter("uname");
- out.print("Hello "+n);
- out.close();
- }catch(Exception e){System.out.println(e);}
- }
- }
web.xml
- <web-app>
- <servlet>
- <servlet-name>s1</servlet-name>
- <servlet-class>FirstServlet</servlet-class>
- </servlet>
- <servlet-mapping>
- <servlet-name>s1</servlet-name>
- <url-pattern>/servlet1</url-pattern>
- </servlet-mapping>
- <servlet>
- <servlet-name>s2</servlet-name>
- <servlet-class>SecondServlet</servlet-class>
- </servlet>
- <servlet-mapping>
- <servlet-name>s2</servlet-name>
- <url-pattern>/servlet2</url-pattern>
- </servlet-mapping>
- </web-app>
3)URL Rewriting
In URL rewriting, we append a token or identifier to the URL of the next Servlet or the next resource. We can send parameter name/value pairs using the following format:
url?name1=value1&name2=value2&??
A name and a value is separated using an equal = sign, a parameter name/value pair is separated from another parameter using the ampersand(&). When the user clicks the hyperlink, the parameter name/value pairs will be passed to the server. From a Servlet, we can use getParameter() method to obtain a parameter value.
Advantage of URL Rewriting
- It will always work whether cookie is disabled or not (browser independent).
- Extra form submission is not required on each pages.
Disadvantage of URL Rewriting
- It will work only with links.
- It can send Only textual information.
Example of using URL Rewriting
In this example, we are maintaning the state of the user using link. For this purpose, we are appending the name of the user in the query string and getting the value from the query string in another page.index.html
- <form action="servlet1">
- Name:<input type="text" name="userName"/><br/>
- <input type="submit" value="go"/>
- </form>
FirstServlet.java
- import java.io.*;
- import javax.servlet.*;
- import javax.servlet.http.*;
- public class FirstServlet extends HttpServlet {
- public void doGet(HttpServletRequest request, HttpServletResponse response){
- try{
- response.setContentType("text/html");
- PrintWriter out = response.getWriter();
- String n=request.getParameter("userName");
- out.print("Welcome "+n);
- //appending the username in the query string
- out.print("<a href='servlet2?uname="+n+"'>visit</a>");
- out.close();
- }catch(Exception e){System.out.println(e);}
- }
- }
SecondServlet.java
- import java.io.*;
- import javax.servlet.*;
- import javax.servlet.http.*;
- public class SecondServlet extends HttpServlet {
- public void doGet(HttpServletRequest request, HttpServletResponse response)
- try{
- response.setContentType("text/html");
- PrintWriter out = response.getWriter();
- //getting value from the query string
- String n=request.getParameter("uname");
- out.print("Hello "+n);
- out.close();
- }catch(Exception e){System.out.println(e);}
- }
- }
web.xml
- <web-app>
- <servlet>
- <servlet-name>s1</servlet-name>
- <servlet-class>FirstServlet</servlet-class>
- </servlet>
- <servlet-mapping>
- <servlet-name>s1</servlet-name>
- <url-pattern>/servlet1</url-pattern>
- </servlet-mapping>
- <servlet>
- <servlet-name>s2</servlet-name>
- <servlet-class>SecondServlet</servlet-class>
- </servlet>
- <servlet-mapping>
- <servlet-name>s2</servlet-name>
- <url-pattern>/servlet2</url-pattern>
- </servlet-mapping>
- </web-app>
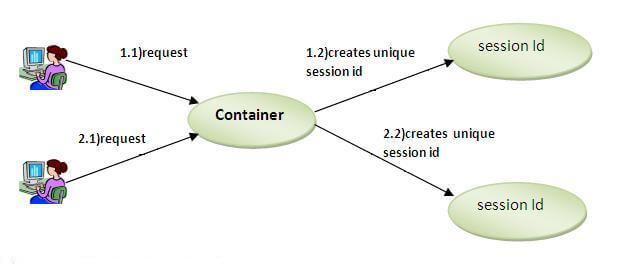
4) HttpSession interface
In such case, container creates a session id for each user.The container uses this id to identify the particular user.An object of HttpSession can be used to perform two tasks: bind objects view and manipulate information about a session, such as the session identifier, creation time, and last accessed time.
How to get the HttpSession object ?
The HttpServletRequest interface provides two methods to get the object of HttpSession:- public HttpSession getSession():Returns the current session associated with this request, or if the request does not have a session, creates one.
- public HttpSession getSession(boolean create):Returns the current HttpSession associated with this request or, if there is no current session and create is true, returns a new session.
Commonly used methods of HttpSession interface
- public String getId():Returns a string containing the unique identifier value.
- public long getCreationTime():Returns the time when this session was created, measured in milliseconds since midnight January 1, 1970 GMT.
- public long getLastAccessedTime():Returns the last time the client sent a request associated with this session, as the number of milliseconds since midnight January 1, 1970 GMT.
- public void invalidate():Invalidates this session then unbinds any objects bound to it.
Example of using HttpSession
In this example, we are setting the attribute in the session scope in one servlet and getting that value from the session scope in another servlet. To set the attribute in the session scope, we have used the setAttribute() method of HttpSession interface and to get the attribute, we have used the getAttribute method.index.html
- <form action="servlet1">
- Name:<input type="text" name="userName"/><br/>
- <input type="submit" value="go"/>
- </form>
FirstServlet.java
- import java.io.*;
- import javax.servlet.*;
- import javax.servlet.http.*;
- public class FirstServlet extends HttpServlet {
- public void doGet(HttpServletRequest request, HttpServletResponse response){
- try{
- response.setContentType("text/html");
- PrintWriter out = response.getWriter();
- String n=request.getParameter("userName");
- out.print("Welcome "+n);
- HttpSession session=request.getSession();
- session.setAttribute("uname",n);
- out.print("<a href='servlet2'>visit</a>");
- out.close();
- }catch(Exception e){System.out.println(e);}
- }
- }
SecondServlet.java
- import java.io.*;
- import javax.servlet.*;
- import javax.servlet.http.*;
- public class SecondServlet extends HttpServlet {
- public void doGet(HttpServletRequest request, HttpServletResponse response)
- try{
- response.setContentType("text/html");
- PrintWriter out = response.getWriter();
- HttpSession session=request.getSession(false);
- String n=(String)session.getAttribute("uname");
- out.print("Hello "+n);
- out.close();
- }catch(Exception e){System.out.println(e);}
- }
- }
web.xml
- <web-app>
- <servlet>
- <servlet-name>s1</servlet-name>
- <servlet-class>FirstServlet</servlet-class>
- </servlet>
- <servlet-mapping>
- <servlet-name>s1</servlet-name>
- <url-pattern>/servlet1</url-pattern>
- </servlet-mapping>
- <servlet>
- <servlet-name>s2</servlet-name>
- <servlet-class>SecondServlet</servlet-class>
- </servlet>
- <servlet-mapping>
- <servlet-name>s2</servlet-name>
- <url-pattern>/servlet2</url-pattern>
- </servlet-mapping>
- </web-app>


No comments:
Post a Comment