Struts 2 Tutorial

The
struts 2 framework is used to develop
MVC-based web application.
The struts framework was initially created by
Craig McClanahan and donated to Apache Foundation in May, 2000 and Struts 1.0 was released in June 2001.
The current stable release of Struts is 2.3.15.1 GA in July 16, 2013.
This struts 2 tutorial covers all the topics of Struts 2 Framework with simplified examples for beginners and experienced persons.
Struts 2 Framework
The Struts 2 framework is used to develop MVC (Model View Controller) based web applications. Struts 2 is the combination of
webwork framework of opensymphony and
struts 1.
- struts2 = webwork + struts1
The Struts 2 provides supports to POJO based actions, Validation Support, AJAX Support, Integration support to various frameworks such as Hibernate, Spring, Tiles etc, support to various result types such as Freemarker, Velocity, JSP etc.
Struts 2 Features Tutorial
Struts 2 provides many features that were not in struts 1. The
important features of struts 2 framework are as follows:
- Configurable MVC components
- POJO based actions
- AJAX support
- Integration support
- Various Result Types
- Various Tag support
- Theme and Template support
1) Configurable MVC components
In struts 2 framework, we provide all the components (view components and action) information in struts.xml file. If we need to change any information, we can simply change it in the xml file.
2) POJO based actions
In struts 2, action class is POJO (Plain Old Java Object) i.e. a simple java class. Here, you are not forced to implement any interface or inherit any class.
3) AJAX support
Struts 2 provides support to ajax technology. It is used to make asynchronous request i.e. it doesn't block the user. It sends only required field data to the server side not all. So it makes the performance fast.
4) Integration Support
We can simply integrate the struts 2 application with hibernate, spring, tiles etc. frameworks.
5) Various Result Types
We can use JSP, freemarker, velocity etc. technologies as the result in struts 2.
6) Various Tag support
Struts 2 provides various types of tags such as UI tags, Data tags, control tags etc to ease the development of struts 2 application.
7) Theme and Template support
Struts 2 provides three types of theme support: xhtml, simple and css_xhtml. The xhtml is default theme of struts 2. Themes and templates can be used for common look and feel.
Model 1 and Model 2 (MVC) Architecture
Before developing the web applications, we need to have idea about design models. There are two types of programming models (design models)
- Model 1 Architecture
- Model 2 (MVC) Architecture
Model 1 Architecture
Servlet and JSP are the main technologies to develop the web applications.
Servlet was considered superior to CGI. Servlet technology doesn't create process, rather it creates thread to handle request. The advantage of creating thread over process is that it doesn't allocate separate memory area. Thus many subsequent requests can be easily handled by servlet.
Problem in Servlet technology Servlet needs to recompile if any designing code is modified. It doesn't provide separation of concern. Presentation and Business logic are mixed up.
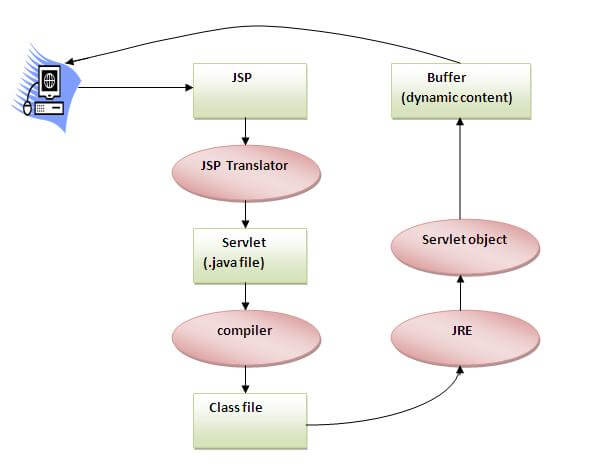
JSP overcomes almost all the problems of Servlet. It provides better separation of concern, now presentation and business logic can be easily separated. You don't need to redeploy the application if JSP page is modified. JSP provides support to develop web application using JavaBean, custom tags and JSTL so that we can put the business logic separate from our JSP that will be easier to test and debug.

As you can see in the above figure, there is picture which show the flow of the model1 architecture.
- Browser sends request for the JSP page
- JSP accesses Java Bean and invokes business logic
- Java Bean connects to the database and get/save data
- Response is sent to the browser which is generated by JSP
Advantage of Model 1 Architecture
- Easy and Quick to develop web application
Disadvantage of Model 1 Architecture
- Navigation control is decentralized since every page contains the logic to determine the next page. If JSP page name is changed that is referred by other pages, we need to change it in all the pages that leads to the maintenance problem.
- Time consuming You need to spend more time to develop custom tags in JSP. So that we don't need to use scriptlet tag.
- Hard to extend It is better for small applications but not for large applications.
Model 2 (MVC) Architecture
Model 2 is based on the MVC (Model View Controller) design pattern. The MVC design pattern consists of three modules model, view and controller.
Model The model represents the state (data) and business logic of the application.
View The view module is responsible to display data i.e. it represents the presentation.
Controller The controller module acts as an interface between view and model. It intercepts all the requests i.e. receives input and commands to Model / View to change accordingly.

Advantage of Model 2 (MVC) Architecture
- Navigation control is centralized Now only controller contains the logic to determine the next page.
- Easy to maintain
- Easy to extend
- Easy to test
- Better separation of concerns
Disadvantage of Model 2 (MVC) Architecture
- We need to write the controller code self. If we change the controller code, we need to recompile the class and redeploy the application.
Solution of Model 2 Architecture: Configurable MVC Components
It uses the declarative approach for defining view components, request mapping etc. It resolves the problem of Model 2 architecture. The Struts framework provides the configurable MVC support. In struts 2, we define all the action classes and view components in struts.xml file.
Steps to create Struts 2 Application Example
- Create the directory structure
- Create input page (index.jsp)
- Provide the entry of Controller in (web.xml) file
- Create the action class (Product.java)
- Map the request with the action in (struts.xml) file and define the view components
- Create view components (welcome.jsp)
- load the jar files
- start server and deploy the project
1) Create the directory structure
The directory structure of struts 2 is same as servlet/JSP. Here, struts.xml file must be located in the classes folder.

2) Create input page (index.jsp)
This jsp page creates a form using struts UI tags. To use the struts UI tags, you need to specify uri /struts-tags. Here, we have used s:form to create a form, s:textfield to create a text field, s:submit to create a submit button.
index.jsp
- <%@ taglib uri="/struts-tags" prefix="s" %>
- <s:form action="product">
- <s:textfield name="id" label="Product Id"></s:textfield>
- <s:textfield name="name" label="Product Name"></s:textfield>
- <s:textfield name="price" label="Product Price"></s:textfield>
- <s:submit value="save"></s:submit>
- </s:form>
3) Provide the entry of Controller in (web.xml) file
In struts 2,
StrutsPrepareAndExecuteFilter class works as the controller. As we know well, struts 2 uses filter for the controller. It is implicitly provided by the struts framework.
web.xml
- <?xml version="1.0" encoding="UTF-8"?>
- <web-app>
- <filter>
- <filter-name>struts2</filter-name>
- <filter-class>
- org.apache.struts2.dispatcher.ng.filter.StrutsPrepareAndExecuteFilter
- </filter-class>
- </filter>
- <filter-mapping>
- <filter-name>struts2</filter-name>
- <url-pattern>/*</url-pattern>
- </filter-mapping>
- </web-app>
4) Create the action class (Product.java)
This is simple bean class. In struts 2, action is POJO (Plain Old Java Object). It has one extra method
execute i.e. invoked by struts framework by default.
Product.java
- package com.javatpoint;
-
- public class Product {
- private int id;
- private String name;
- private float price;
- public int getId() {
- return id;
- }
- public void setId(int id) {
- this.id = id;
- }
- public String getName() {
- return name;
- }
- public void setName(String name) {
- this.name = name;
- }
- public float getPrice() {
- return price;
- }
- public void setPrice(float price) {
- this.price = price;
- }
-
- public String execute(){
- return "success";
- }
- }
5) Map the request in (struts.xml) file and define the view components
It is the important file from where struts framework gets information about the action and decides which result to be invoked. Here, we have used many elements such as struts, package, action and result.
struts element is the root elements of this file. It represents an application.
package element is the sub element of struts. It represents a module of the application. It generally extends the
struts-default package where many interceptors and result types are defined.
action element is the sub element of package. It represents an action to be invoked for the incoming request. It has name, class and method attributes. If you don't specify name attribute by default execute() method will be invoked for the specified action class.
result element is the sub element of action. It represents an view (result) that will be invoked. Struts framework checks the string returned by the action class, if it returns success, result page for the action is invoked whose name is success or has no name. It has
name and
type attributes. Both are optional. If you don't specify the result name, by default success is assumed as the result name. If you don't specify the type attribute, by default
dispatcher is considered as the default result type. We will learn about result types later.
struts.xml
- <?xml version="1.0" encoding="UTF-8" ?>
- <!DOCTYPE struts PUBLIC "-
- Configuration 2.1
- <struts>
- <package name="default" extends="struts-default">
-
- <action name="product" class="com.javatpoint.Product">
- <result name="success">welcome.jsp</result>
- </action>
-
- </package>
- </struts>
6) Create view components (welcome.jsp)
It is the view component the displays information of the action. Here, we are using struts tags to get the information.
The s:property tag returns the value for the given name, stored in the action object.
welcome.jsp
- <%@ taglib uri="/struts-tags" prefix="s" %>
-
- Product Id:<s:property value="id"/><br/>
- Product Name:<s:property value="name"/><br/>
- Product Price:<s:property value="price"/><br/>
7) Load the jar files
To run this application, you need to have the struts 2 jar files. Here, we are providing all the necessary jar files for struts 2. Download it and put these jar files in the lib folder of your project.
8) start server and deploy the project
Finally, start the server and deploy the project and access it.


To simply create the struts application, you may now use IDE such as eclipse, myeclipse, netbeans, RAD, JDeveloper etc.
.jpg)