.jpg)
LayoutManagers:
The LayoutManagers are used to arrange components in a particular manner. LayoutManager is an interface that is implemented by all the classes of layout managers. There are following classes that represents the layout managers:- java.awt.BorderLayout
- java.awt.FlowLayout
- java.awt.GridLayout
- java.awt.CardLayout
- java.awt.GridBagLayout
- javax.swing.BoxLayout
- javax.swing.GroupLayout
- javax.swing.ScrollPaneLayout
- javax.swing.SpringLayout etc.
BorderLayout:
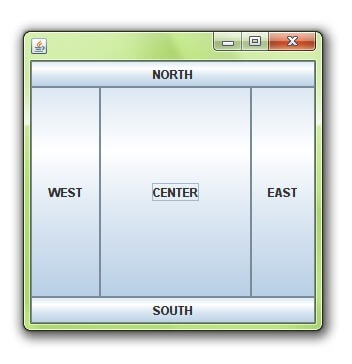
The BorderLayout is used to arrange the components in five regions: north, south, east, west and center. Each region (area) may contain one component only. It is the default layout of frame or window. The BorderLayout provides five constants for each region:- public static final int NORTH
- public static final int SOUTH
- public static final int EAST
- public static final int WEST
- public static final int CENTER
Constructors of BorderLayout class:
- BorderLayout(): creates a border layout but with no gaps between the components.
- JBorderLayout(int hgap, int vgap): creates a border layout with the given horizontal and vertical gaps between the components.
Example of BorderLayout class:
- import java.awt.*;
- import javax.swing.*;
- public class Border {
- JFrame f;
- Border(){
- f=new JFrame();
- JButton b1=new JButton("NORTH");;
- JButton b2=new JButton("SOUTH");;
- JButton b3=new JButton("EAST");;
- JButton b4=new JButton("WEST");;
- JButton b5=new JButton("CENTER");;
- f.add(b1,BorderLayout.NORTH);
- f.add(b2,BorderLayout.SOUTH);
- f.add(b3,BorderLayout.EAST);
- f.add(b4,BorderLayout.WEST);
- f.add(b5,BorderLayout.CENTER);
- f.setSize(300,300);
- f.setVisible(true);
- }
- public static void main(String[] args) {
- new Border();
- }
- }
GridLayout
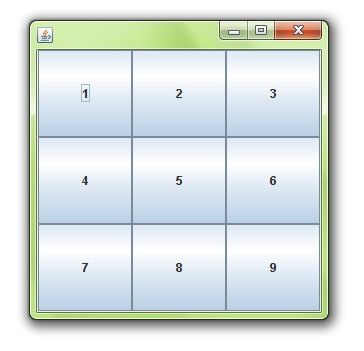
| The GridLayout is used to arrange the components in rectangular grid. One component is displayed in each rectangle. |
Constructors of GridLayout class:
|
Example of GridLayout class:
- import java.awt.*;
- import javax.swing.*;
- public class MyGridLayout{
- JFrame f;
- MyGridLayout(){
- f=new JFrame();
- JButton b1=new JButton("1");
- JButton b2=new JButton("2");
- JButton b3=new JButton("3");
- JButton b4=new JButton("4");
- JButton b5=new JButton("5");
- JButton b6=new JButton("6");
- JButton b7=new JButton("7");
- JButton b8=new JButton("8");
- JButton b9=new JButton("9");
- f.add(b1);f.add(b2);f.add(b3);f.add(b4);f.add(b5);
- f.add(b6);f.add(b7);f.add(b8);f.add(b9);
- f.setLayout(new GridLayout(3,3));
- //setting grid layout of 3 rows and 3 columns
- f.setSize(300,300);
- f.setVisible(true);
- }
- public static void main(String[] args) {
- new MyGridLayout();
- }
- }
FlowLayout
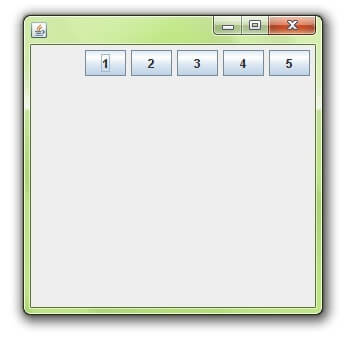
| The FlowLayout is used to arrange the components in a line, one after another (in a flow). It is the default layout of applet or panel. |
Fields of FlowLayout class:
|
Constructors of FlowLayout class:
|
Example of FlowLayout class:
- import java.awt.*;
- import javax.swing.*;
- public class MyFlowLayout{
- JFrame f;
- MyFlowLayout(){
- f=new JFrame();
- JButton b1=new JButton("1");
- JButton b2=new JButton("2");
- JButton b3=new JButton("3");
- JButton b4=new JButton("4");
- JButton b5=new JButton("5");
- f.add(b1);f.add(b2);f.add(b3);f.add(b4);f.add(b5);
- f.setLayout(new FlowLayout(FlowLayout.RIGHT));
- //setting flow layout of right alignment
- f.setSize(300,300);
- f.setVisible(true);
- }
- public static void main(String[] args) {
- new MyFlowLayout();
- }
- }
BoxLayout class:
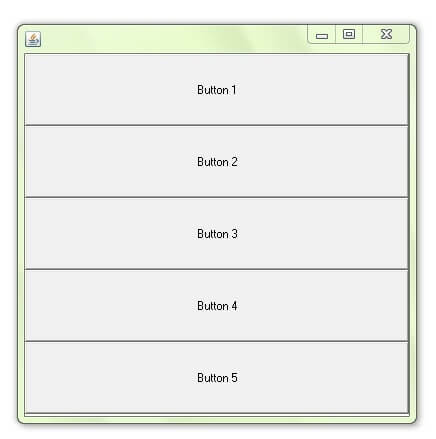
The BoxLayout is used to arrange the components either vertically or horizontally. For this purpose, BoxLayout provides four constants. They are as follows: Note: BoxLayout class is found in javax.swing package.
Fields of BoxLayout class:
- public static final int X_AXIS
- public static final int Y_AXIS
- public static final int LINE_AXIS
- public static final int PAGE_AXIS
Constructor of BoxLayout class:
- BoxLayout(Container c, int axis): creates a box layout that arranges the components with the given axis.
Example of BoxLayout class with Y-AXIS:
- import java.awt.*;
- import javax.swing.*;
- public class BoxLayoutExample1 extends Frame {
- Button buttons[];
- public BoxLayoutExample1 () {
- buttons = new Button [5];
- for (int i = 0;i<5;i++) {
- buttons[i] = new Button ("Button " + (i + 1));
- add (buttons[i]);
- }
- setLayout (new BoxLayout (this, BoxLayout.Y_AXIS));
- setSize(400,400);
- setVisible(true);
- }
- public static void main(String args[]){
- BoxLayoutExample1 b=new BoxLayoutExample1();
- }
- }
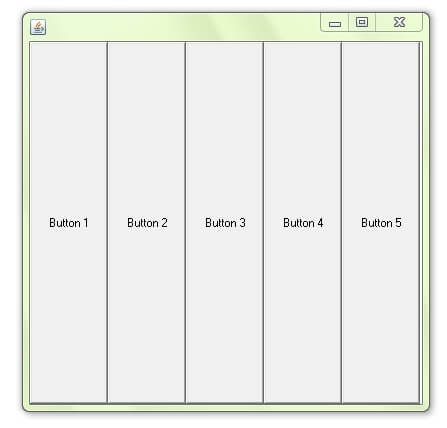
Example of BoxLayout class with X-AXIS:
- import java.awt.*;
- import javax.swing.*;
- public class BoxLayoutExample2 extends Frame {
- Button buttons[];
- public BoxLayoutExample2() {
- buttons = new Button [5];
- for (int i = 0;i<5;i++) {
- buttons[i] = new Button ("Button " + (i + 1));
- add (buttons[i]);
- }
- setLayout (new BoxLayout(this, BoxLayout.X_AXIS));
- setSize(400,400);
- setVisible(true);
- }
- public static void main(String args[]){
- BoxLayoutExample2 b=new BoxLayoutExample2();
- }
- }
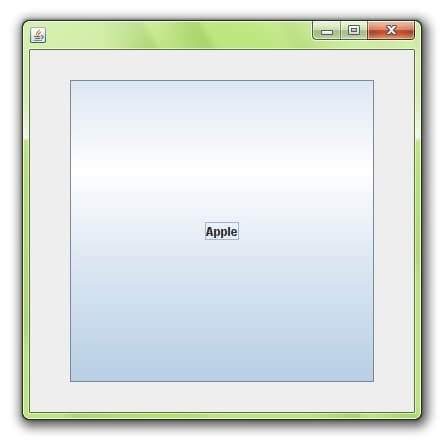
CardLayout class
The CardLayout class manages the components in such a manner that only one component is visible at a time. It treats each component as a card that is why it is known as CardLayout. Constructors of CardLayout class:
- CardLayout(): creates a card layout with zero horizontal and vertical gap.
- CardLayout(int hgap, int vgap): creates a card layout with the given horizontal and vertical gap.
Commonly used methods of CardLayout class:
- public void next(Container parent): is used to flip to the next card of the given container.
- public void previous(Container parent): is used to flip to the previous card of the given container.
- public void first(Container parent): is used to flip to the first card of the given container.
- public void last(Container parent): is used to flip to the last card of the given container.
- public void show(Container parent, String name): is used to flip to the specified card with the given name.
Example of CardLayout class:
- import java.awt.*;
- import java.awt.event.*;
- import javax.swing.*;
- public class CardLayoutExample extends JFrame implements ActionListener{
- CardLayout card;
- JButton b1,b2,b3;
- Container c;
- CardLayoutExample(){
- c=getContentPane();
- card=new CardLayout(40,30);
- //create CardLayout object with 40 hor space and 30 ver space
- c.setLayout(card);
- b1=new JButton("Apple");
- b2=new JButton("Boy");
- b3=new JButton("Cat");
- b1.addActionListener(this);
- b2.addActionListener(this);
- b3.addActionListener(this);
- c.add("a",b1);c.add("b",b2);c.add("c",b3);
- }
- public void actionPerformed(ActionEvent e) {
- card.next(c);
- }
- public static void main(String[] args) {
- CardLayoutExample cl=new CardLayoutExample();
- cl.setSize(400,400);
- cl.setVisible(true);
- cl.setDefaultCloseOperation(EXIT_ON_CLOSE);
- }
- }


No comments:
Post a Comment