.jpg)
JSP (Java Server Pages)

JSP technology is used to create web application just like Servlet technology. It can be thought of as an extension to servlet because it provides more functionality than servlet such as expression language, jstl etc.
A JSP page consists of HTML tags and JSP tags. The jsp pages are easier to maintain than servlet because we can separate designing and development. It provides some additional features such as Expression Language, Custom Tag etc.
Advantage of JSP over Servlet
There are many advantages of JSP over servlet. They are as follows:
1) Extension to Servlet
JSP technology is the extension to servlet technology. We can use all the features of servlet in JSP. In addition to, we can use implicit objects, predefined tags, expression language and Custom tags in JSP, that makes JSP development easy.
2) Easy to maintain
JSP can be easily managed because we can easily separate our business logic with presentation logic. In servlet technology, we mix our business logic with the presentation logic.
3) Fast Development: No need to recompile and redeploy
If JSP page is modified, we don't need to recompile and redeploy the project. The servlet code needs to be updated and recompiled if we have to change the look and feel of the application.
4) Less code than Servlet
In JSP, we can use a lot of tags such as action tags, jstl, custom tags etc. that reduces the code. Moreover, we can use EL, implicit objects etc.
Life cycle of a JSP Page
The JSP pages follows these phases:
- Translation of JSP Page
- Compilation of JSP Page
- Classloading (class file is loaded by the classloader)
- Instantiation (Object of the Generated Servlet is created).
- Initialization ( jspInit() method is invoked by the container).
- Reqeust processing ( _jspService() method is invoked by the container).
- Destroy ( jspDestroy() method is invoked by the container).
Note: jspInit(), _jspService() and jspDestroy() are the life cycle methods of JSP.
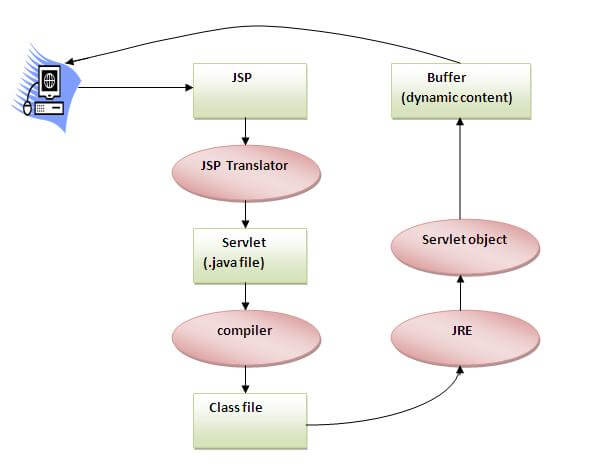
As depicted in the above diagram, JSP page is translated into servlet by the help of JSP translator. The JSP translator is a part of webserver that is responsible to translate the JSP page into servlet. Afterthat Servlet page is compiled by the compiler and gets converted into the class file. Moreover, all the processes that happens in servlet is performed on JSP later like initialization, committing response to the browser and destroy.
Creating a simple JSP Page
To create the first jsp page, write some html code as given below, and save it by .jsp extension. We have save this file as index.jsp. Put it in a folder and paste the folder in the web-apps directory in apache tomcat to run the jsp page.
index.jsp
Let's see the simple example of JSP, here we are using the scriptlet tag to put java code in the JSP page. We will learn scriptlet tag later.
- <html>
- <body>
- <% out.print(2*5); %>
- </body>
- </html>
It will print 10 on the browser.
How to run a simple JSP Page ?
Follow the following steps to execute this JSP page:
- Start the server
- put the jsp file in a folder and deploy on the server
- visit the browser by the url http://localhost:portno/contextRoot/jspfile e.g. http://localhost:8888/myapplication/index.jsp
Do I need to follow directory structure to run a simple JSP ?
No, there is no need of directory structure if you don't have class files or tld files. For example, put jsp files in a folder directly and deploy that folder.It will be running fine.But if you are using bean class, Servlet or tld file then directory structure is required.
Directory structure of JSP
The directory structure of JSP page is same as servlet. We contains the jsp page outside the WEB-INF folder or in any directory.

The JSP API
The JSP API consists of two packages:
- javax.servlet.jsp
- javax.servlet.jsp.tagext
javax.servlet.jsp package
The javax.servlet.jsp package has two interfaces and classes.The two interfaces are as follows:
- JspPage
- HttpJspPage
The classes are as follows:
- JspWriter
- PageContext
- JspFactory
- JspEngineInfo
- JspException
- JspError
The JspPage interface
According to the JSP specification, all the generated servlet classes must implement the JspPage interface. It extends the Servlet interface. It provides two life cycle methods.

Methods of JspPage interface
- public void jspInit(): It is invoked only once during the life cycle of the JSP when JSP page is requested firstly. It is used to perform initialization. It is same as the init() method of Servlet interface.
- public void jspDestroy(): It is invoked only once during the life cycle of the JSP before the JSP page is destroyed. It can be used to perform some clean up operation.
The HttpJspPage interface
The HttpJspPage interface provides the one life cycle method of JSP. It extends the JspPage interface.
Method of HttpJspPage interface:
- public void _jspService(): It is invoked each time when request for the JSP page comes to the container. It is used to process the request. The underscore _ signifies that you cannot override this method.
JSP Scriptlet tag (Scripting elements)
In JSP, java code can be written inside the jsp page using the scriptlet tag. Let's see what are the scripting elements first.
Scripting elements
The scripting elements provides the ability to insert java code inside the jsp. There are three types of scripting elements:
- scriptlet tag
- expression tag
- declaration tag
JSP scriptlet tag
A scriptlet tag is used to execute java source code in JSP. Syntax is as follows:
- <% java source code %>
- <% java source code %>
Simple Example of JSP scriptlet tag
In this example, we are displaying a welcome message.
- <html>
- <body>
- <% out.print("welcome to jsp"); %>
- </body>
- </html>
- <html>
- <body>
- <% out.print("welcome to jsp"); %>
- </body>
- </html>
Example of JSP scriptlet tag that prints the user name
In this example, we have created two files index.html and welcome.jsp. The index.html file gets the username from the user and the welcome.jsp file prints the username with the welcome message.
index.html
- <html>
- <body>
- <form action="welcome.jsp">
- <input type="text" name="uname">
- <input type="submit" value="go"><br/>
- </form>
- </body>
- </html>
- <html>
- <body>
- <form action="welcome.jsp">
- <input type="text" name="uname">
- <input type="submit" value="go"><br/>
- </form>
- </body>
- </html>
welcome.jsp
- <html>
- <body>
- <%
- String name=request.getParameter("uname");
- out.print("welcome "+name);
- %>
- </form>
- </body>
- </html>
- <html>
- <body>
- <%
- String name=request.getParameter("uname");
- out.print("welcome "+name);
- %>
- </form>
- </body>
- </html>
JSP expression tag
| The code placed within expression tag is written to the output stream of the response. So you need not write out.print() to write data. It is mainly used to print the values of variable or method. |
Syntax of JSP expression tag
- <%= statement %>
- <%= statement %>
Example of JSP expression tag
| In this example of jsp expression tag, we are simply displaying a welcome message. |
- <html>
- <body>
- <%= "welcome to jsp" %>
- </body>
- </html>
Note: Do not end your statement with semicolon in case of expression tag.
Example of JSP expression tag that prints current time
| To display the current time, we have used the getTime() method of Calendar class. The getTime() is an instance method of Calendar class, so we have called it after getting the instance of Calendar class by the getInstance() method. |
index.jsp
- <html>
- <body>
- Current Time: <%= java.util.Calendar.getInstance().getTime() %>
- </body>
- </html>
- <html>
- <body>
- Current Time: <%= java.util.Calendar.getInstance().getTime() %>
- </body>
- </html>
Example of JSP expression tag that prints the user name
| In this example, we are printing the username using the expression tag. The index.html file gets the username and sends the request to the welcome.jsp file, which displays the username. |
index.html
- <html>
- <body>
-
- <form action="welcome.jsp">
- <input type="text" name="uname"><br/>
- <input type="submit" value="go">
- </form>
- </body>
- </html>
- <html>
- <body>
- <form action="welcome.jsp">
- <input type="text" name="uname"><br/>
- <input type="submit" value="go">
- </form>
- </body>
- </html>
welcome.jsp
- <html>
- <body>
- <%= "Welcome "+request.getParameter("uname") %>
- </form>
- </body>
- </html>
- <html>
- <body>
- <%= "Welcome "+request.getParameter("uname") %>
- </form>
- </body>
- </html>
JSP Declaration Tag
The JSP declaration tag is used to declare fields and methods.
The code written inside the jsp declaration tag is placed outside the service() method of auto generated servlet.
So it doesn't get memory at each request.
Syntax of JSP declaration tag
The syntax of the declaration tag is as follows:
- <%! field or method declaration %>
- <%! field or method declaration %>
Difference between the jsp scriptlet tag and jsp declaration tag ?
| Jsp Scriptlet Tag | Jsp Declaration Tag |
|---|---|
| The jsp scriptlet tag can only declare variables not methods. | The jsp declaration tag can declare variables as well as methods. |
| The declaration of scriptlet tag is placed inside the _jspService() method. | The declaration of jsp declaration tag is placed outside the _jspService() method. |
Example of JSP declaration tag that declares field
In this example of JSP declaration tag, we are declaring the field and printing the value of the declared field using the jsp expression tag.
index.jsp
- <html>
- <body>
-
- <%! int data=50; %>
- <%= "Value of the variable is:"+data %>
-
- </body>
- </html>
- <html>
- <body>
- <%! int data=50; %>
- <%= "Value of the variable is:"+data %>
- </body>
- </html>
Example of JSP declaration tag that declares method
In this example of JSP declaration tag, we are defining the method which returns the cube of given number and calling this method from the jsp expression tag. But we can also use jsp scriptlet tag to call the declared method.
index.jsp
- <html>
- <body>
-
- <%!
- int cube(int n){
- return n*n*n*;
- }
- %>
-
- <%= "Cube of 3 is:"+cube(3) %>
-
- </body>
- </html>
- <html>
- <body>
- <%!
- int cube(int n){
- return n*n*n*;
- }
- %>
- <%= "Cube of 3 is:"+cube(3) %>
- </body>
- </html>
JSP directives
There are three types of directives:The jsp directives are messages that tells the web container how to translate a JSP page into the corresponding servlet.
- page directive
- include directive
- taglib directive
Syntax of JSP Directive
- <%@ directive attribute="value" %>
JSP page directive
The page directive defines attributes that apply to an entire JSP page.
Syntax of JSP page directive
- <%@ page attribute="value" %>
Attributes of JSP page directive
|
1)import
| The import attribute is used to import class,interface or all the members of a package.It is similar to import keyword in java class or interface. |
Example of import attribute
- <html>
- <body>
- <%@ page import="java.util.Date" %>
- Today is: <%= new Date() %>
- </body>
- </html>
2)contentType
The contentType attribute defines the MIME(Multipurpose Internet Mail Extension) type of the HTTP response.The default value is "text/html;charset=ISO-8859-1".
Example of contentType attribute
- <html>
- <body>
- <%@ page contentType=application/msword %>
- Today is: <%= new java.util.Date() %>
- </body>
- </html>
3)extends
The extends attribute defines the parent class that will be inherited by the generated servlet.It is rarely used.
4)info
This attribute simply sets the information of the JSP page which is retrieved later by using getServletInfo() method of Servlet interface.
Example of info attribute
- <html>
- <body>
- <%@ page info="composed by Sonoo Jaiswal" %>
- Today is: <%= new java.util.Date() %>
- </body>
- </html>
The web container will create a method getServletInfo() in the resulting servlet.For example:
- public String getServletInfo() {
- return "composed by Sonoo Jaiswal";
- }
5)buffer
The buffer attribute sets the buffer size in kilobytes to handle output generated by the JSP page.The default size of the buffer is 8Kb.
Example of buffer attribute
- <html>
- <body>
- <%@ page buffer="16kb" %>
- Today is: <%= new java.util.Date() %>
- </body>
- </html>
6)language
The language attribute specifies the scripting language used in the JSP page. The default value is "java".
7)isELIgnored
| We can ignore the Expression Language (EL) in jsp by the isELIgnored attribute. By default its value is false i.e. Expression Language is enabled by default. We see Expression Language later. |
- <%@ page isELIgnored="true" %>//Now EL will be ignored
8)isThreadSafe
| Servlet and JSP both are multithreaded.If you want to control this behaviour of JSP page, you can use isThreadSafe attribute of page directive.The value of isThreadSafe value is true.If you make it false, the web container will serialize the multiple requests, i.e. it will wait until the JSP finishes responding to a request before passing another request to it.If you make the value of isThreadSafe attribute like: |
<%@ page isThreadSafe="false" %>
The web container in such a case, will generate the servlet as:
- public class SimplePage_jsp extends HttpJspBase
- implements SingleThreadModel{
- .......
- }
9)errorPage
The errorPage attribute is used to define the error page, if exception occurs in the current page, it will be redirected to the error page.
Example of errorPage attribute
- //index.jsp
- <html>
- <body>
- <%@ page errorPage="myerrorpage.jsp" %>
- <%= 100/0 %>
- </body>
- </html>
10)isErrorPage
The isErrorPage attribute is used to declare that the current page is the error page.
Note: The exception object can only be used in the error page.
Example of isErrorPage attribute
- //myerrorpage.jsp
- <html>
- <body>
- <%@ page isErrorPage="true" %>
- Sorry an exception occured!<br/>
- The exception is: <%= exception %>
- </body>
- </html>
Jsp Include Directive
Advantage of Include directiveThe include directive is used to include the contents of any resource it may be jsp file, html file or text file. The include directive includes the original content of the included resource at page translation time (the jsp page is translated only once so it will be better to include static resource).
Code Reusability
Syntax of include directive
- <%@ include file="resourceName" %>
Example of include directive
In this example, we are including the content of the header.html file. To run this example you must create an header.html file.
- <html>
- <body>
- <%@ include file="header.html" %>
- Today is: <%= java.util.Calendar.getInstance().getTime() %>
- </body>
- </html>
Note: The include directive includes the original content, so the actual page size grows at runtime.
JSP Taglib directive
Syntax JSP Taglib directive The JSP taglib directive is used to define a tag library that defines many tags. We use the TLD (Tag Library Descriptor) file to define the tags. In the custom tag section we will use this tag so it will be better to learn it in custom tag.
- <%@ taglib uri="uriofthetaglibrary" prefix="prefixoftaglibrary" %>
Example of JSP Taglib directive
In this example, we are using our tag named currentDate. To use this tag we must specify the taglib directive so the container may get information about the tag.
- <html>
- <body>
- <%@ taglib uri="http://www.javatpoint.com/tags" prefix="mytag" %>
- <mytag:currentDate/>
- </body>
- </html>


No comments:
Post a Comment